Enemas: Why and How To Do a Coffee Enema
Coffee enemas have become increasingly popular in the functional medicine world for supporting constipation, bile flow, and detoxification. But do they actually work, and are they safe?
In this article, I’ll explain the potential benefits, the current evidence, who should avoid them, and exactly how to perform one safely at home.
Water enemas and Coffee enemas
Enemas, both with water or coffee, have been employed for centuries by various cultures and civilisations as a method of promoting health and cleansing the body.
This ancient practice of rectal irrigation has been known for its various benefits such as waste elimination, aid in detoxification, alleviate constipation, and support of digestive health.
The use of enemas has stood the test of time, with documented historical accounts dating back to ancient Egypt, Greece, and Rome.
Two main types of enemas
Water enemas involve the introduction of purified water into the rectum, while coffee enemas, a variation gaining popularity in recent times, use an infusion of coffee for its added cleansing properties. The benefits of enemas are believed to extend beyond mere waste elimination: they’re been used in most detox protocols - including parasites - as well as in cancer treatment protocols as seen in The Gerson Therapy. There are also many other types of enemas (salt, molasses, etc.), but for the sake of this article we will focus on coffee enemas. Keep in mind you can start with “simple” purified water enemas by following the steps below and omitting the coffee altogether.
How Coffee Enemas Work
Coffee enemas have a greater effect on the body than water enemas due to the numerous compounds present in coffee.
For instance, compounds such as theobromine, theophylline, palmitic acid and caffeine travel through the rectum's rich capillary bed and into the portal vein, directly reaching the liver (reminder that the liver is the body's main detoxification organ). These compounds play a role in dilating blood vessels and opening bile ducts, facilitating the release of bile containing toxins.
During the 10-15 minutes of holding the coffee enema in the colon, the body's entire blood supply circulates through the liver 4-5 times. In our toxins-filled world, this enema can serve as an incredible method to assist the body in detoxification.
Benefits of Coffee Enemas
First, a quick note: Coffee enemas have been used in naturopathic and integrative medicine for decades as a supportive therapy. While many people report improvements in symptoms such as constipation, headaches, or a general sense of wellbeing, the scientific evidence remains limited. More high-quality human studies are needed to confirm many of the benefits reported by patients and observed by practitioners in clinical practice.
The list of potential benefits from coffee enemas is a long one, and everyone experiences them differently. Here’s an overview of what they can help with:
Detoxification: The caffeine in coffee stimulates the liver to produce more bile, which in turn enhances the elimination of toxins from the body. Coffee enemas also improve blood circulation, cellular regeneration and tissue repair.
Improved Digestive Health: Coffee enemas may help promote healthy digestion by stimulating the production of enzymes that aid in the breakdown of waste and toxins in the colon. They can help with constipation and feeling less “toxic”.
Pain Relief: Many individuals report that coffee enemas help to alleviate pain, especially those suffering from conditions like headaches, migraines or chronic pain syndrome.
Boosted Energy Levels: The caffeine in coffee enemas gets absorbed into the bloodstream quite rapidly, bypassing the digestive system altogether. They can increase energy levels and reduce brain fog and fatigue by aiding in the removal of accumulated waste and toxins.
Who Should Avoid Coffee Enemas?
Coffee enemas are not appropriate for everyone.
You should avoid them if you:
are pregnant
have active inflammatory bowel disease (Crohn’s disease or ulcerative colitis flare)
have rectal bleeding or hemorrhoids that are actively bleeding
recently had bowel surgery
have severe electrolyte imbalances or kidney disease
have significant heart rhythm disorders
have a history of bowel perforation or diverticulitis
Serious complications are extremely rare but can occur, especially when coffee enemas are used inappropriately or despite contraindications. If you experience severe pain, dizziness, persistent bleeding, or fever after an enema, seek medical attention immediately.
How to Do a Coffee Enema
Now onto the good part: what do you need and how to actually do it.
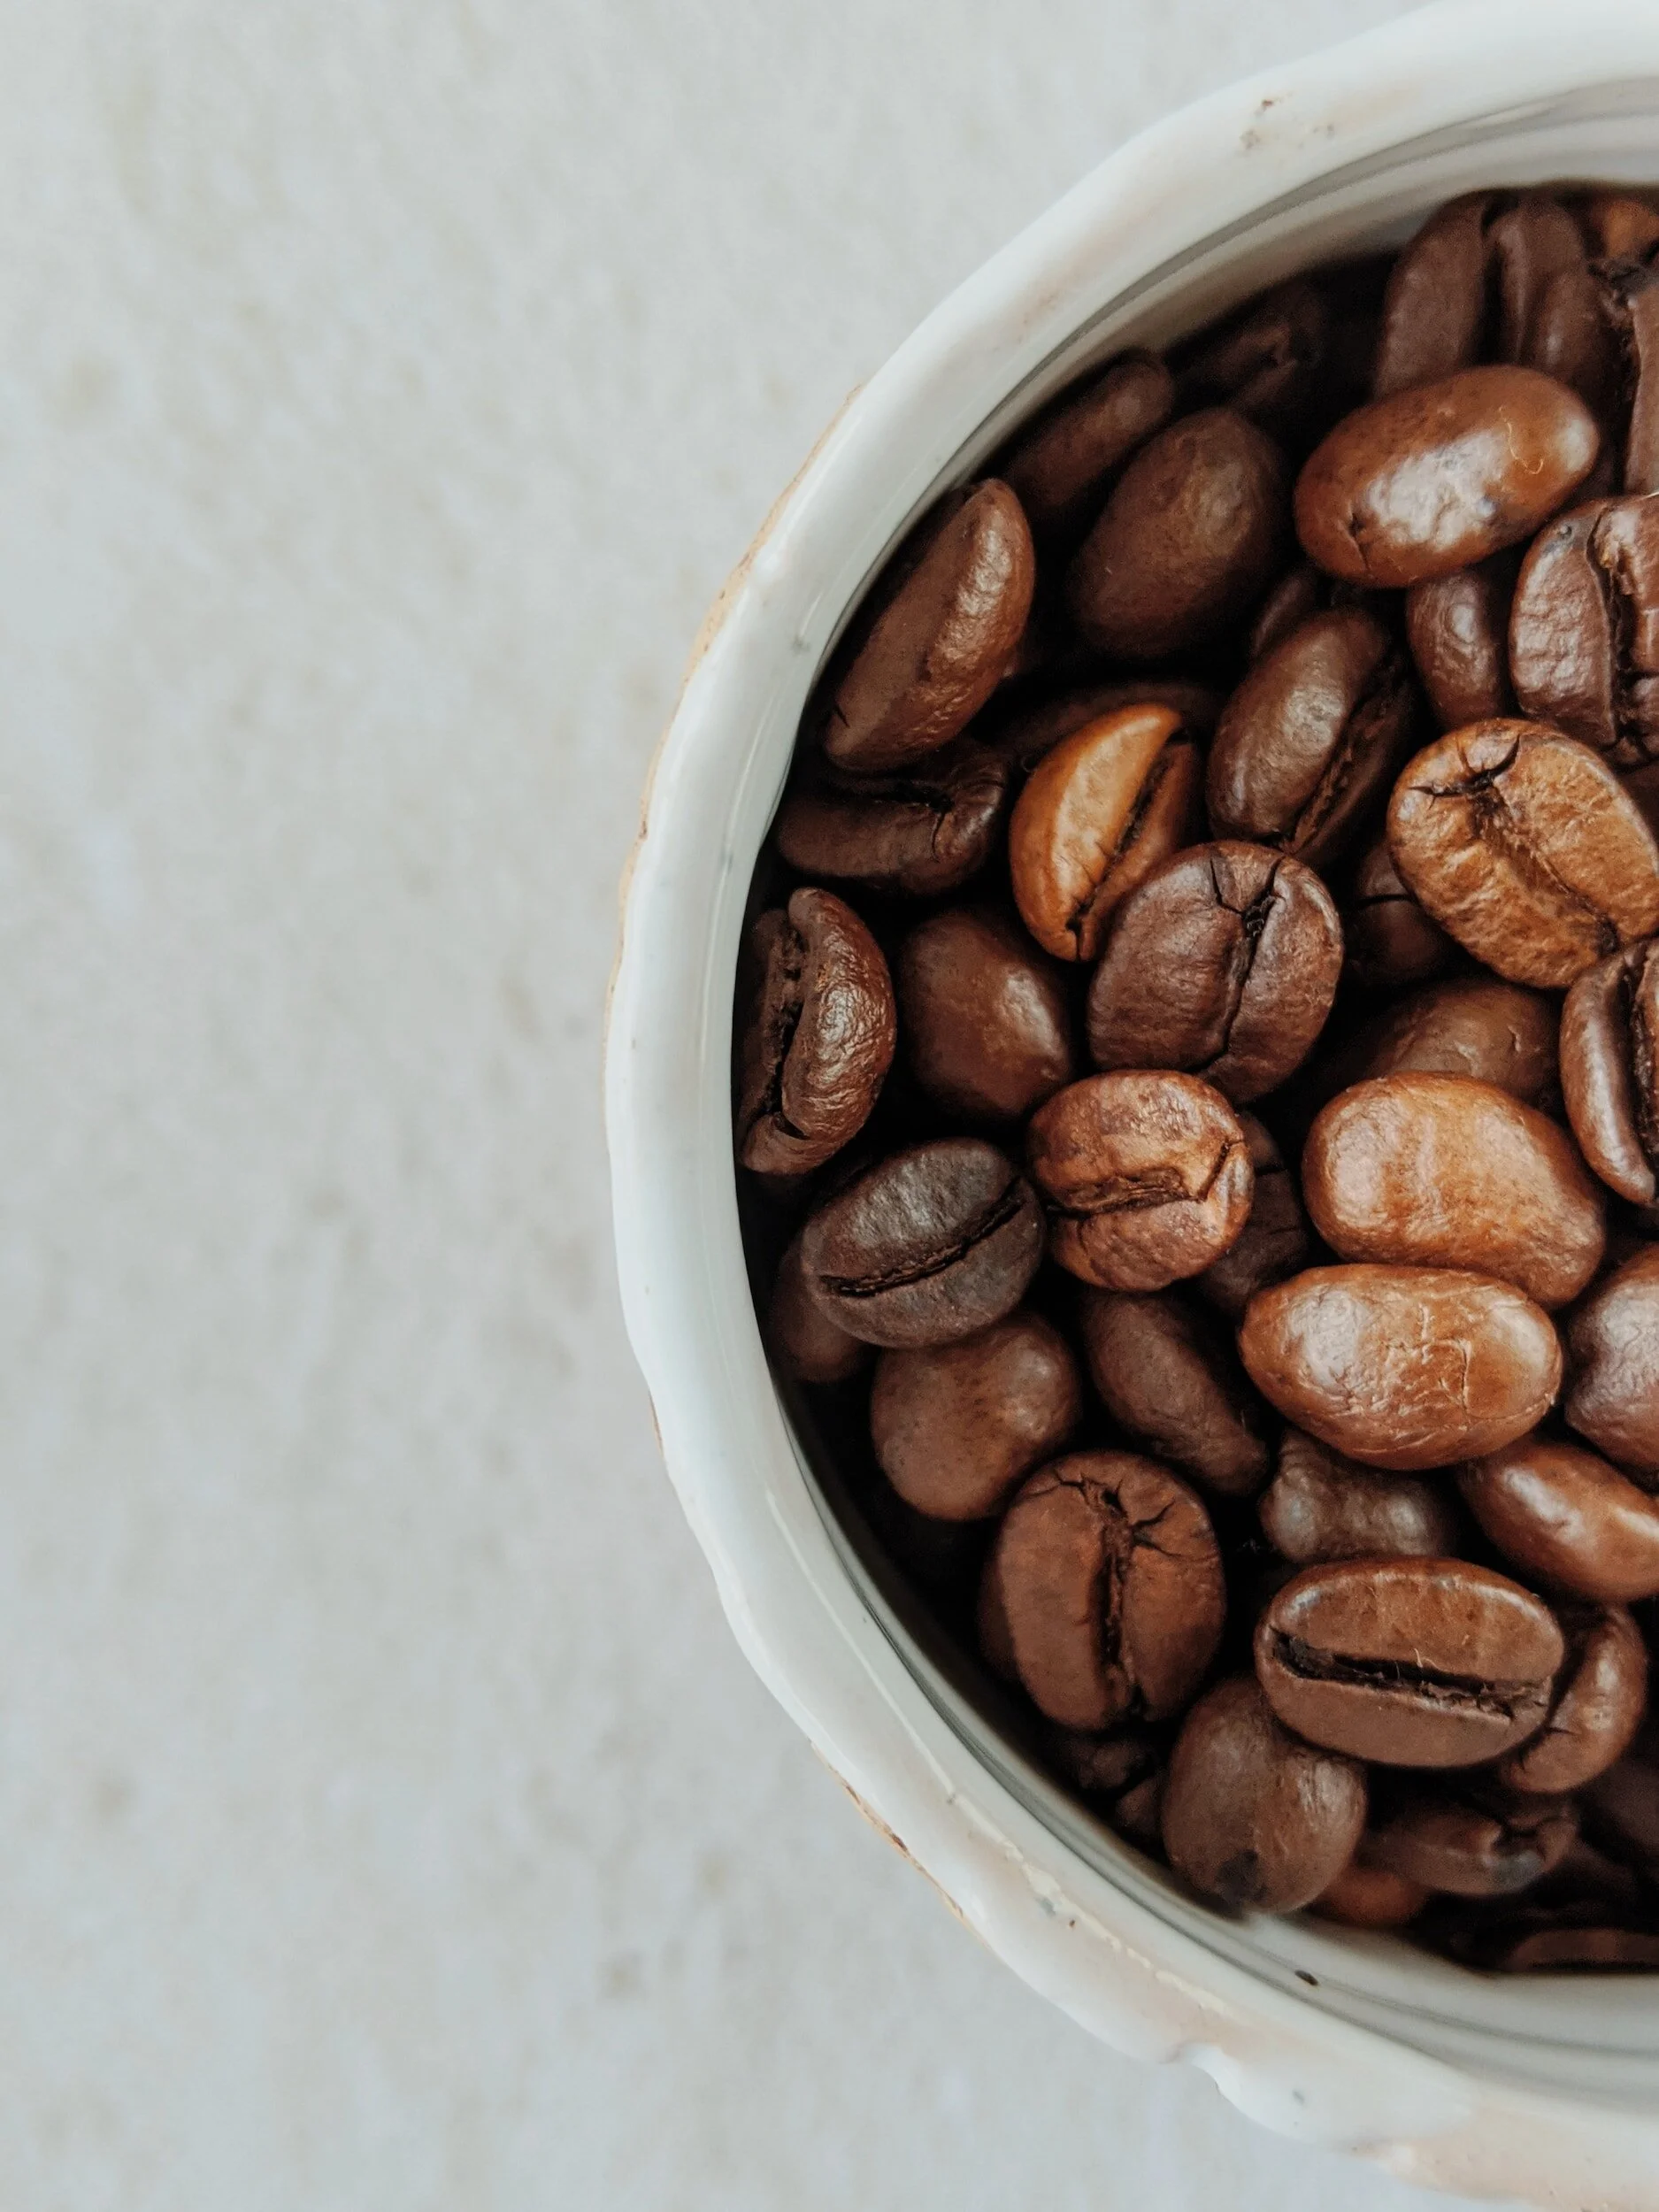
First, you need to know that you can’t use just any regular coffee from the grocery store. It is best to get the purest coffee possible, organic and mold-free. Why? Cause you want to feel better, not worse. Because everything gets absorbed better down there, we want to make sure we are not adding in more toxins but instead rather facilitating their removal.

I recommend this brand of coffee (not sponsored) which you can usually get easily on Amazon. It is a specialty coffee specifically for enemas, tested for mold and certified organic. It is the only brand I personally use but there are a few others on the market. Just make sure the one you choose is of the highest quality, and ideally also high in palmitic acid. This coffee is not for drinking, it would actually be quite disgusting!
Next your need an enema kit. There are some kits including a silicone bag and some kits using a bucket.
I have tried both and actually prefer the transparent silicone bag (make sure you can see through it - it helps during the enema process but also for cleaning afterwards). But it is totally up to you, both ways work similarly.
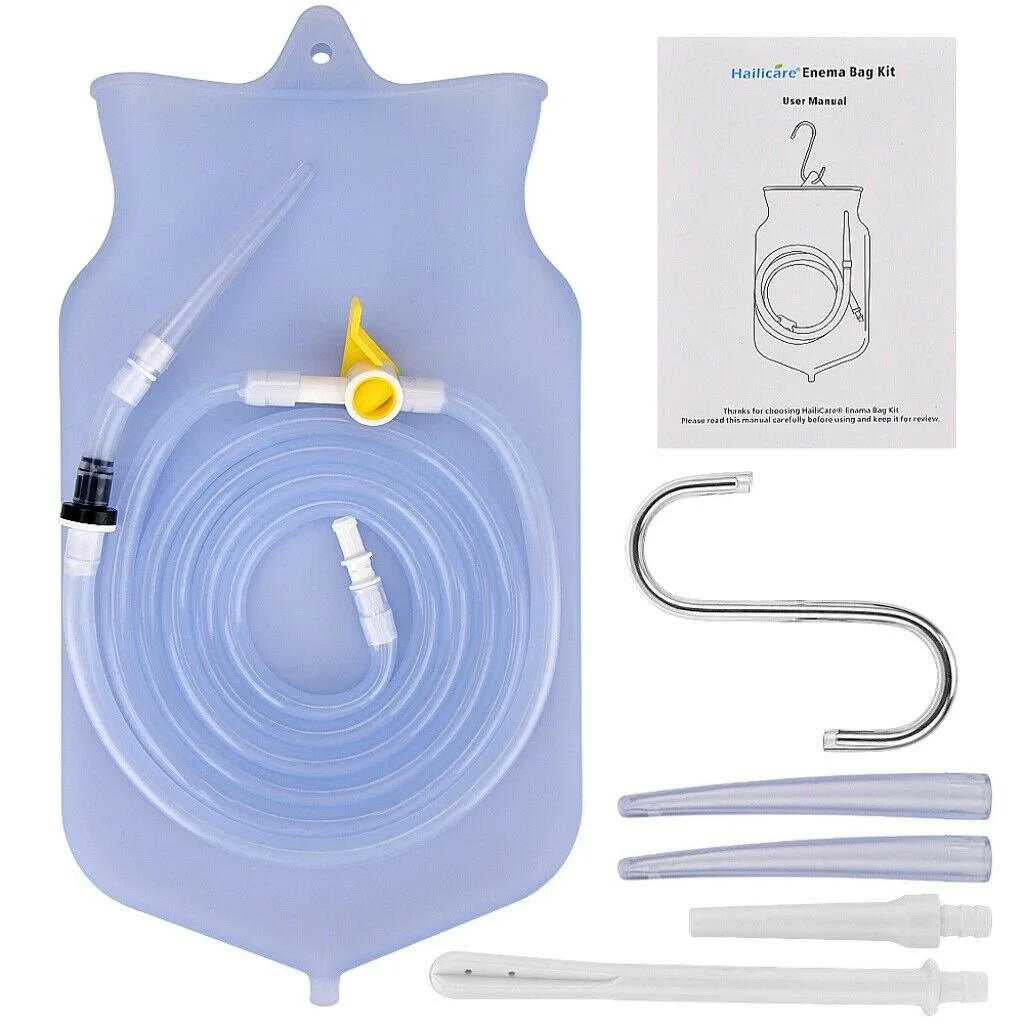
Here is the type of enema kit (with silicone bag) I use and recommend. It is relatively cheap and easy to use and clean.
Finally you will need filtered or purified water. I usually buy bottled distilled water but if you have a reverse osmosis system or any other good water filtering system at home then you can use that water as well. Please do not use regular tap water, as it is filled with contaminants such as chlorine, fluoride, pesticides, medications, heavy metals, etc.
Binders are optional but I highly recommend them. You can use activated charcoal capsules, Cellcore Biotoxin Binder or any binder that you like. I usually take 2 capsules just before and sometimes 2 capsules after.
Okay, now that we have everything we need, let’s get down to business.
The steps - how to actually do a coffee enema
Place 2 to 3 cups of purified water and one to two tablespoons (15-30ml) of coffee in a saucepan and bring to a boil. **NOTE: The very first time you do a coffee enema, use only 1 teaspoon (5ml) of coffee. This is crucial because some people are sensitive to caffeine and will feel very jittery if more coffee is used. After a few enemas, you will know how much coffee you can tolerate comfortably. Ideally, increase to two tablespoons per enema.
Let it boil for at least 2-3 minutes. Once boiling, reduce heat to lowest setting and simmer for an additional ~10 minutes. Then turn off the heat and allow it to cool. Wait until the coffee is about body temperature. It should feel slightly warm on your pinky finger. If the solution is too hot or too cold, retaining the enema will be more difficult. You can also add cold filtered/distilled water to it if you want to accelerate the process.
Once cooled down, use a fine stainless steel strainer (or coffee filter paper) to pour and filter the coffee solution into your enema bucket/bag. Ensure the hose is securely attached to the enema bag and that the clamp is closed so that you don’t make a mess.
If needed, especially if water as evaporated during the boil, add additional filtered or distilled water to the enema bucket/bag. I like to use between 500ml to 1 liter total liquid per enema. The enema bag that I use has measuring marks on it so it helps to know how much liquid you have total. I personally feel the most comfortable at around ~700ml but some people can hold more liquid.
Prepare a comfortable space with towels in the bathtub or bathroom. I recommend starting in the bathroom for easy cleanup in case of leaks or accidents. As you become more experienced, you can choose different locations.
If you haven't had a bowel movement yet that day, start with a plain water enema before proceeding to the coffee enema. This helps cleanse the bowel quickly and effectively. While some individuals can hold the coffee enema without having done a water enema prior, everyone's tolerance is different.
Attach the slender enema tip to the end of the enema tube and apply a small amount of personal lubricant or coconut oil on it for ease of insertion.
To eliminate air from the enema tube, slightly grasp the hose clamp without closing it. Position the tip in the sink and elevate the enema bag or bucket above the tip until water starts flowing out. Then, close the clamp to expel any air in the tube. The presence of air bubbles in your colon can make it hard to hold the enema and give you the urge to evacuate too soon.
Using the hook provided, place the enema bucket or bag at about door handle level or on a countertop approximately 3 feet above the ground. The higher the bucket, the faster the fluid will flow.
There are a few positions possible to administrer the enema. I recommend lying on your left side with your knees bent (foetal position), as it is usually the most comfortable. Some people like to be on their back or on their elbows and knees (all fours). You can try it out for yourself and see what you prefer.
Take the lubricated tip and gently insert it about an inch or two (2-4 cm) into the rectum. Do not force the entry. If you experience resistance, change the angle of the tip and try again.
Hold the tube in place and unclamp the tube/open the valve and let the solution flow into your rectum. If it feels like too much pressure, feel free to clamp it midway through. You may experience a sense of fullness, which usually passes after a couple of seconds. If you paused, unclamp again and let the solution go in until you the bucket or bag is empty or until you can’t take any more. If it's not going in, adjust the bucket height or move the tip slightly for the right angle.
Now that it's in, you can slowly remove the tip and either lie down on your back or lie on your right side to get the coffee to the portal vein and liver for glutathione production. You may feel the urge to have a bowel movement; try to breathe through it, but never continue if you have pain. You can massage you belly in circular motions clockwise.
Try to retain the enema for about 15 minutes. Less time is okay, especially for beginners. It is just less effective. You will build resistance over time. Alternatively, you may have to do three enemas for 5 minutes at a time. Changing position also helps to keep the coffee in longer. Use the time to read a book, listen to a podcast or meditate. Some people can get up and lie on a towel in bed instead of on the floor or in the bathtub.
After 15 minutes or so, go to the toilet and empty out the solution. Some water may remain inside, which is okay. If it is the case for you, it could indicate that you may be dehydrated.
Finishing Up & Tips
Clean the enema bag/bucket and tube thoroughly with soap and water. Wipe the insertion tip with alcohol. If possible and sunny outside, let it out to dry in the sun completely before putting it away.
The entire process usually takes about one hour, so make sure to set aside enough time if it’s your first time. However, with regular practice and minimal fecal matter to evacuate, you can complete a quick enema in just under 30 minutes. It doesn't have to be time-consuming.
If you feel a bit off or bloated after the enema, try some reflexology. Massage the tops of both feet, focusing on the left foot. You can also massage the entire foot, especially any tender areas. This often helps balance the body's energies after a coffee retention enema.
During your first few enemas, you may experience some nausea during or after the process. This is often due to the release of internal stagnant, putrefied toxins. Do no let this deter you from continuing with the coffee enemas. Eventually, most people find that the nausea clears within a short time. If you do experience nausea, you may want to follow the enema with a warm cup of tea (such as decaffeinated green tea or ginger tea).
Keep in mind that it's ideal to have a bowel movement before attempting the coffee enema.
If the enema makes you feel jittery, decrease the coffee amount. For instance, use one teaspoon instead of two tablespoons. You can also simply start with plain water enemas.
The coffee enema might lead to a drop in your blood sugar levels. If this happens, eat something just before or after the enema. It's common to feel quite hungry after the enema!
Take the biotoxin binder or activated charcoal before your enema to mop up toxins, I take 2 caps 20 min prior.
That’s it!
Frequently Asked Questions About Coffee Enemas
Are coffee enemas safe?
Coffee enemas are generally considered low-risk when used occasionally, correctly prepared, and in appropriate individuals. However, they are not suitable for everyone.
Most reported issues occur when they are used too frequently, performed incorrectly, or used in people with underlying conditions such as inflammatory bowel disease, recent bowel surgery, significant haemorrhoids, kidney or heart conditions, or electrolyte imbalances.
Because of this, coffee enemas should always be used cautiously and ideally under the guidance of a qualified healthcare practitioner. If you are unsure whether they are appropriate for you, it is best to seek personalised advice before starting.
How often should you do a coffee enema?
There is no universal guideline, as frequency depends on the individual and the reason they are being used.
In integrative and naturopathic practice, coffee enemas are typically used occasionally rather than daily, often as part of a short-term supportive protocol.
Using them too frequently may increase the risk of dehydration, electrolyte imbalance, or irritation of the rectal lining. For this reason, they should not be viewed as a long-term daily routine unless specifically supervised by a practitioner.
Can coffee enemas help constipation?
Many people report that coffee enemas provide temporary relief from constipation, particularly when other approaches have not been effective. I was unfortunately one of those people, relying on coffee enemas for about a year of my life. That was back when I reached rock bottom; you can read a bit more about my story on the about page.
This effect is likely related to stimulation of the rectum and colon, which can trigger bowel movement reflexes. However, they do not address the underlying causes of constipation, such as motility issues, low fibre intake, dehydration, or nervous system dysregulation.
For chronic constipation, it is important to also investigate and address root causes rather than relying on enemas as a primary strategy.
Can I use regular coffee?
No; it is generally recommended to use organic, light to medium roast coffee, prepared specifically for enemas like the one I mentioned above.
Regular coffee can sometimes be used, but I do not recommend it as it may contain higher levels of impurities, oils, or compounds that are more irritating to the intestinal lining. Enema-specific coffee is typically prepared to reduce these compounds and is preferred in clinical practice.
Absolutely avoid using instant coffee, flavoured coffee, or decaffeinated coffee, as these are not considered appropriate for enema use.
Do not hesitate to contact me if you have any questions, or book a session below to work with me.